1. 본 글은 아래의 공식 페이지를 이용해 작성하는 글입니다!

2. 저의 나름대로의 요약이니, 틀린 부분 지적 부탁드립니다!

3. 총 2개의 섹션으로 분리해서 나눠서 작성할 예정입니다.

THE GENERAL "WORKFLOW" - HOW IT ALL WORKS

  • 욕토를 시작하기 위해서는 개발자들은 architecture, policies, patches and configuration details 등을 명시해줘야 합니다.
  • 빌드 시스템은 그러면 소스코드를 fetch하고 다운로드 합니다. 이 프로젝트는 우선 tarball 또는 code repository 같은 git과 같은 방식을 지원합니다.
  • 다운로드가 되면, 소스코드는 로컬 영역에 extract 됩니다. 그리고 소프트웨어를 configuring과 compiling하기 step이 진행됩니다.
  • 소프트웨어는 그럼 인스톨되어질것인데, 개발자들이 선택한 바이너리 패키지 포맷이 사용되어지는 경로입니다.
  • 다양한 QA와 sanity check가 실행되어 집니다.

DEVELOPMENT ENVIRONMENT - HOST SETUP

  1. 위 빌드 과정을 수행하기 위한 host는 보통 리눅스를 이용하는것같네요.

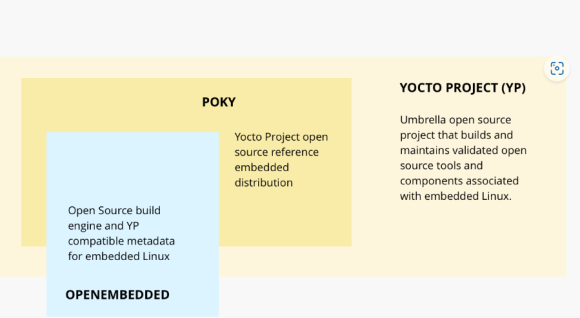
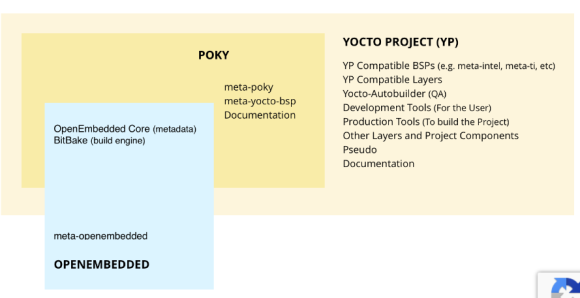
REFERENCE EMBEDDED DISTRIBUTION (POKY)

  • poky는 위에도 언급했듯이 레퍼런스 배포판입니다! poky는 빌드시스템(bitbake and OpenEmbedded Core) 뿐만 아니라 다양한 metadata를 가지고 있습니다.

총 2부로 간략하게 마무리 하겠습니다.

사실 쓰다보니 2부정도로 마무리가 될 수 있겠다 판단이 들었습니다 ㅎㅎ;

'LINUX > yocto' 카테고리의 다른 글

yocto project 컨셉 이해(1)  (0) 2022.11.02
local.conf 주요 환경 변수  (0) 2022.02.22
욕토 프로젝트 시작하기  (0) 2022.02.22
욕토 프로젝트 용어  (0) 2021.07.08

1. 본 글은 아래의 공식 페이지를 이용해 작성하는 글입니다!

2. 저의 나름대로의 요약이니, 틀린 부분 지적 부탁드립니다!

3. 총 3개의 섹션으로 분리해서 나눠서 작성할 예정입니다.

Software – Yocto Project

GETTING STARTED: THE YOCTO PROJECT® OVERVIEW

yocto project(이하 YP)를 이해하기 위해서는 크게 2가지의 컴포넌트를 이해하셔야 합니다.

  1. OpenEmbedded 프로젝트(이하 OE)
  2. Poky
  3. YP

OE는 커스텀 리눅스 배포판을 빌드하기 위한 "빌드 시스템 프레임워크"입니다.

Openembedded.org

YP는 customized linux distribution을 제작하기 위한 프로젝트입니다. 그리고 주 프로덕트 타겟은 임베디드 프로덕트입니다. 일반적인 범용 PC가 주 타겟은 아닌듯합니다.

그리고 YP는 customized linux distribution을 빌드하기 위한 빌드 시스템으로, OE를 채택했습니다.

YP가 제공하는 여러 툴과 OE를 이용하여 빌드한 YP의 레퍼런스 distribution인 Poky가 탄생합니다.

Poky는 사실 BUILD EXAMPLE입니다. 이 example을 이용해 small embedded os를 제작할 수 있습니다. 즉, 리눅스 배포판을 제작할 수 있다는 것입니다. 그럼 example에는 뭐가 있다느 것일까요? 예시로 Bitbake라는 빌드 엔진, 그리고 core build system metadata가 있습니다.

특히 위에 2개는 recipeslayers라고 불립니다. 개발자는 이러한 것을 수정, 복사할 수 있습니다.

THE LAYER MODEL - THE KEY TO CUSTOMIZATION

YP는 임베디드 리눅스 제작을 위해 Layer Model 이라는 개발 모델을 가지고 있습니다.

레이어는 일종의 레포지토리입니다. 빌드 시스템에게 이것저것, 무엇을 해야하는지 알려주는 명령어 집합을 가지고 있습니다. 빌드 시스템은 이 명령어 집합들을 종합해서 리눅스 배포판을 제작하는 것입니다.

개발자는 이 레이어를 그대로 이용하는것에서 멈추지 않고, 수정과 삭제 또한 할 수 있습니다.

개발자는 레이어들을 논리적으로 분리해서 이용할 수도 있습니다. 예시로, 특정 벤더들이 내놓은 개발보드가 있다고 가정하겠습니다. 이러한 보드들의 BSP, GUI, Config, Middleware, application의 레이어를 분리할 수 있다는 것입니다. 이러한 것들은 특정 칩 벤더들에게 가능하면 제공받는것이 좋습니다. (ex STMicroelectronics)

이러한 YP layer들은 아래의 두 링크에서 확인할 수 있습니다.

  1. https://www.yoctoproject.org/software-overview/layers/
  2. http://layers.openembedded.org/

유의 사항으로 2번의 OE 링크 경우, 덜 검증된 부분이 있다고 합니다.

COMPONENTS AND TOOLS MAINTAINED BY THE YOCTO PROJECT

위 사진을 보면 meta-poky, meta-yocto-bsp, document 등의 것이 있는것을 확인할 수 있습니다. 이러한 것들은 유저의 커스텀 리눅스 개발을 위해 사용됩니다. 또한 YP 그 자체를 위해 이용되기도 합니다.

위 내용들을 종합하면 아래와 같습니다.

TERMS FOR REFERENCE

  • Configuration Files: Files which hold global definitions of variables, user defined variables and hardware configuration information. They tell the build system what to build and put into the image to support a particular platform.
  • Recipe: The most common form of metadata. A recipe will contain a list of settings and tasks (instructions) for building packages which are then used to build the binary image. A recipe describes where you get source code and which patches to apply. Recipes describe dependencies for libraries or for other recipes, as well as configuration and compilation options. They are stored in layers.
  • Layer: A collection of related recipes. Layers allow you to consolidate related metadata to customize your build, and isolate information for multiple architecture builds. Layers are hierarchical in their ability to override previous specifications. You can include any number of available layers from the Yocto Project and customize the build by adding your layers after them. The Layer Index is searchable for layers within Yocto Project.
  • Metadata: A key element of the Yocto Project is the meta-data which is used to construct a Linux distribution, contained in the files that the build system parses when building an image. In general, Metadata includes recipes, configuration files and other information refering to the build instructions themselves, as well as the data used to control what things get built and to affect how they are built. The meta-data also includes commands and data used to indicate what versions of software are used, and where they are obtained from, as well as changes or additions to the software itself (patches or auxiliary files) which are used to fix bugs or customize the software for use in a particular situation. OpenEmbedded Core is an important set of validated metadata.
  • OpenEmbedded-Core: oe-core is meta-data comprised of foundation recipes, classes and associated files that are meant to be common among many different OpenEmbedded-derived systems, including the Yocto Project. It is a curated subset of an original repository developed by the OpenEmbedded community which has been pared down into a smaller, core set of continuously validated recipes resulting in a tightly controlled and an quality-assured core set of recipes.
  • Poky: A reference embedded distribution and a reference test configuration created to 1) provide a base level functional distro which can be used to illustrate how to customize a distribution, 2) to test the Yocto Project components, Poky is used to validate Yocto Project, and 3) as a vehicle for users to download Yocto Project. Poky is not a product level distro, but a good starting point for customization. Poky is an integration layer on top of oe-core.
  • Build System - "Bitbake": a scheduler and execution engine which parses instructions (recipes) and configuration data. It then creates a dependency tree to order the compilation, schedules the compilation of the included code, and finally, executes the building of the specified, custom Linux image (distribution). BitBake is a make-like build tool. BitBake recipes specify how a particular package is built. They include all the package dependencies, source code locations, configuration, compilation, build, install and remove instructions. Recipes also store the metadata for the package in standard variables. Related recipes are consolidated into a layer. During the build process dependencies are tracked and native or cross-compilation of the package is performed. As a first step in a cross-build setup, the framework will attempt to create a cross-compiler toolchain (Extensible SDK) suited for the target platform.
  • Packages: The output of the build system used to create your final image.
  • Extensible Software Development Kit (ESDK): A custom SDK for application developers that allows them to incorporate their library and programming changes back into the image to make their code available to other apps developers.
  • Image: A binary form of a Linux distribution (operating system) intended to be loaded onto a device.

2편에서 추가로 작성하겠습니다!

'LINUX > yocto' 카테고리의 다른 글

yocto project 컨셉 이해(2)  (0) 2022.11.02
local.conf 주요 환경 변수  (0) 2022.02.22
욕토 프로젝트 시작하기  (0) 2022.02.22
욕토 프로젝트 용어  (0) 2021.07.08

 부지런히 하자. 암만 생각해봐도 공부하지않으면 도태될 운명이다 ㅜㅜ. 

1) 알고리즘은 어려운 문제에 대해 욕심내지말고, 그냥 쉬운 문제를 꾸준히 풀자

2) 그래픽스 공부, 강의 학습 제대로 이행하자.

3) 수학 공부하자

4) 영어 구문공부, 듣기공부하자. 텝스 또는 토익 고득점 받아보자.

'내 낙서장' 카테고리의 다른 글

수행해 온 일 (??) 정리  (0) 2022.05.26
안녕하세요.  (0) 2022.02.23
할 일  (0) 2021.12.06
재미있는 것과 재미없는 것, 그리고 주제 파악.  (0) 2021.09.12

https://www.acmicpc.net/problem/1244


1244번: 스위치 켜고 끄기

첫째 줄에는 스위치 개수가 주어진다. 스위치 개수는 100 이하인 양의 정수이다. 둘째 줄에는 각 스위치의 상태가 주어진다. 켜져 있으면 1, 꺼져있으면 0이라고 표시하고 사이에 빈칸이 하나씩

www.acmicpc.net


switch_cnt = int(input())
switch_status = ["제로"] + list(map(int, input().split()))
student_status = []
student_cnt = int(input())
for i in range(student_cnt):
student_status.append(list(map(int, input().split())))
for i in student_status:
if i[0] == 1:
for j in range(1, switch_cnt + 1):
if i[1] * j > switch_cnt:
break
switch_status[(i[1] * j)] = int(not switch_status[(i[1] * j)])
else:
switch_status[i[1]] = int(not switch_status[i[1]])
for j in range(1, switch_cnt + 1):
if i[1] - j < 0 or i[1] + j > switch_cnt:
break
else:
if switch_status[(i[1] - j)] == switch_status[(i[1] + j)]:
switch_status[(i[1] - j)] = int(not switch_status[(i[1] - j)])
switch_status[(i[1] + j)] = int(not switch_status[(i[1] + j)])
else:
break
for i in range(1, switch_cnt + 1):
print(switch_status[i], end=" ")
if (i % 20) == 0:
print("")
view raw 1244.py hosted with ❤ by GitHub

개념적으로는 쉬운 문제였지만 저는 for loop 설정을 잘못해 너무 많은 시간을 디버깅하는데 쏟았습니다.

아래와 같이 쉽게 풀 수 있습니다.


/** 원노트 동기화되면 풀이 올리기

'문제풀이 > 백준' 카테고리의 다른 글

10828 - 스택  (0) 2022.12.31
2628 - 종이 자르기  (0) 2022.12.07
15685 - 드래곤 커브  (0) 2022.04.23
10026 - 적록색약  (0) 2022.04.23
2163 - 초콜릿 자르기  (0) 2022.04.23

ili9341.pdf
3.38MB

본 글은 stm32의 예제를 따라가며 작성합니다. 틀린 부분 지적해주시면 감사하겠습니다.


초기화 단계

  1. 어떤 인터페이스를 이용하느냐 → i2c
  2. 간단한 다이어그램은 아래와 같습니다.
    stm32 chip LTDC <-> LCD driver (ex ILI9341) <-> lcd-tft panel
  3. 어떤 제어 명령을 내려야하느냐
    • level 1 command register 제어
    • level 2 command register 제어
    •  
     

level 1 command register 제어
level 2 command register 제어

'C > 코딩' 카테고리의 다른 글

센서 등의 디바이스 id 가져오기  (0) 2022.04.24
native c poll 함수는 polling인가  (0) 2022.01.13
스트리밍 데이터 처리  (0) 2022.01.01

최근 회사일을 진행하면 cpp에서 c 함수를 불러와야하는 일이 있습니다. 확실하게 해두기 위해 아래와 같이 정리합니다.


cpp 코드

#include <iostream>

extern "C" {
void test_c_func();
}

int main(void)
{
    test_c_func();

    printf("i'm a c++ file\n");
    return 0;
}

/**
extern "C" void f(int); // one way
extern "C" {            // another way
int g(double);
double h();
};
void code(int i, double d)
{
    f(i);
    int ii = g(d);
    double dd = h();
    // ...
}
*/

c

#include <stdio.h>

void test_c_func();

void test_c_func()
{
    printf("i'm a c file\n");
}

CMakefiles.txt

add_executable(
    test
    test.cpp
    test.c
)

결과

[100%] Built target test
yeopgi@DESKTOP-NHP2NBA:~/coding/c++_coding/mixing_c_cpp(master)$ ./test 
i'm a c file
i'm a c++ file
yeopgi@DESKTOP-NHP2NBA:~/coding/c++_coding/mixing_c_cpp(master)$ ls -al

만일 extern "C" {} 처리를 하지않으면 빌드 에러가 발생합니다.

yeopgi@DESKTOP-NHP2NBA:~/coding/c++_coding/mixing_c_cpp(master)$ make
Scanning dependencies of target test
[ 33%] Building CXX object CMakeFiles/test.dir/test.cpp.o
[ 66%] Linking CXX executable test
/usr/bin/ld: CMakeFiles/test.dir/test.cpp.o: in function `main':
test.cpp:(.text+0x9): undefined reference to `test_c_func()'
collect2: error: ld returned 1 exit status
make[2]: *** [CMakeFiles/test.dir/build.make:99: test] Error 1
make[1]: *** [CMakeFiles/Makefile2:76: CMakeFiles/test.dir/all] Error 2
make: *** [Makefile:84: all] Error 2
yeopgi@DESKTOP-NHP2NBA:~/coding/c++_coding/mixing_c_cpp(master)$

'C++ > 코딩' 카테고리의 다른 글

c++ member pointer  (0) 2022.11.02

OpenGL의 가장 기초적인 함수입니다.

https://docs.microsoft.com/ko-kr/windows/win32/opengl/glvertex2f


glVertex2f 함수(Gl.h) - Win32 apps

꼭짓점을 지정합니다. | glVertex2f 함수(Gl.h)

docs.microsoft.com


꼭지점을 지정하는 함수입니다.

void WINAPI glVertex2f(
   GLfloat x,
   GLfloat y
);


삼각형을 그리려면 아래와 같은 코드로 가능합니다.

#include "./include/gl/glut.h"

void display()
{
	glClearColor(1.0f, 1.0f, 1.0f, 1.0f);
	glClear(GL_COLOR_BUFFER_BIT);
	glColor3f(0.0f, 0.0f, 1.0f);
	glBegin(GL_POLYGON);
	/**
	glBegin()은 그리기 시작
	*/
	glVertex2f(-0.5f, -0.5f);
	glVertex2f(0.5f, -0.5f);
	glVertex2f(0.5f, 0.5f);
	glEnd();
	/**
	glEnd()는 그리기 종료
	*/
	glFinish();
}

int main(int argc, char** argv)
{
	glutInit(&argc, argv);
	glutCreateWindow("OpenGL");
	glutDisplayFunc(display);
	glutMainLoop();
	return 0;
}

'그래픽스 > OpenGL' 카테고리의 다른 글

LearnOpenGL - Introduction  (0) 2023.01.23
LearnOpenGL 번역  (0) 2023.01.23
삼각형 그리기  (0) 2023.01.06
파이썬 opengl 패키지 설치  (0) 2022.07.12

파이썬 환경에서 openGL을 이용하기 위해 아래 패키지들을 설치합니다.

  • pip3 install PyOpenGL
  • pip3 install PyOpenGL_accelerate

저는 linaro에서 설치를 진행했는데, 아래와 같은 에러가 발생했었습니다.


Downloading https://files.pythonhosted.org/packages/68/89/ada28ebf7e30a73791e3d946843c6f471101eee637d67d44cde87ec30698/glfw-2.5.3.tar.gz
    Complete output from command python setup.py egg_info:
    Traceback (most recent call last):
      File "<string>", line 1, in <module>
    ImportError: No module named 'setuptools'
    
    ----------------------------------------
Command "python setup.py egg_info" failed with error code 1 in /tmp/pip-build-kbw9ya_j/glfw/


이럴때는 아래와 같이 조치합니다.

sudo apt-get install python3-setuptools


그리고 다시 설치를 진행하면 됩니다.

'그래픽스 > OpenGL' 카테고리의 다른 글

LearnOpenGL - Introduction  (0) 2023.01.23
LearnOpenGL 번역  (0) 2023.01.23
삼각형 그리기  (0) 2023.01.06
OpenGL glVertex2f()  (0) 2022.07.27

+ Recent posts